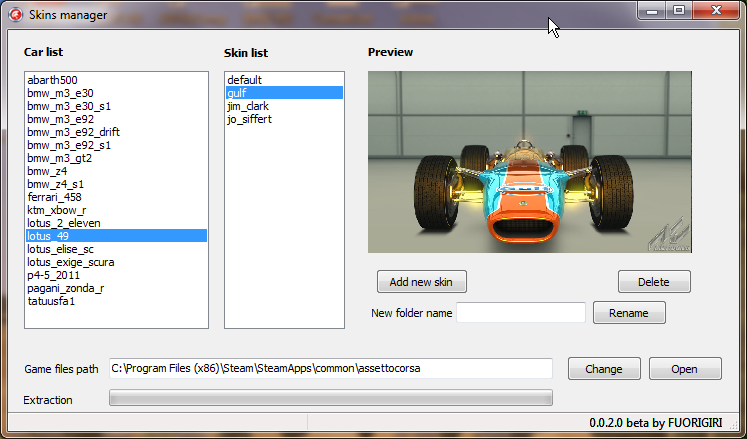

Assetto Corsa user Fuorigiri created an application to speed up and facilitate installation and removal of custom skins.
He reports that he has tested the application on Windows 7 64 bit.
The application is designed to function with the exiting file path structure of “Early Access” and “Steam”. Fuorigiri also advises you to run the application as an administrator.
[EXPAND Original Forum post Click here]
Exploring skins
As you start application you’ll see all available cars under “car list” column.
If you click on a car you’ll see all skins related under “skin list” column. If you click on a skin a preview will be displayed.
If you double click on a car name it will be opened relative folder. The same happens for skin names.
Install a new skin
Select a car under “car list” column.
Click on Add new skin button, select compressed archive (only .rar, .7z and .zip) and the application will extract all files to right path.
Delete a skin
Select a car under “car list” column.
Select a skin under “skin list” column.
Click on Delete button.
You can also delete multiple skins: just hold CTRL and select skins with mouse then click on Delete button.
Rename folder of a skin
Select a car under “car list” column.
Select a skin under “skin list” column.
Write a name of your choice in the box next to “New folder name” label and click on Rename button
I suggest to run application as administrator.
If you have any problem please attach a screenshot and provide url of the forum post where you downloaded the skin.
Changelog
0.0.3.0
fixed initial directory issue
0.0.2.0
Added button for setting “assettocorsa” path
| Official Webpage – http://www.assettocorsa.net |
 Bsimracing Sim Racing Resources and News for the racing enthousiast.


